
Minnie Mouse Birthday
I love crafting and creating special projects for my family and friends. My daughter's 2nd birthday; Minnie Mouse 'Oh TWOddles' party was one of my favorite projects. The colors were vibrant and playful, and the decorations turned out absolutely adorable. Take a look at what I made for the party below, and get inspired to create your own fun and festive projects!
As an affiliate partner of various brands and sponsored content, we may earn commission on qualifying purchases.

Minnie Mouse Cake Topper
(Click the picture to left for "How to" instructions)
What You Will Need:
- Cricut Machine
- Cricut sticky mat
- Cardstock Paper of your choosing. I got mine from Michaels
- Hot glue
- Craft Foam
- Acetate
- Foam Tape
- Beads, sequins, etc for the shaker
- Scissors
3D Letters
I have such a love/hate relationship with these 3D letters. They always turn out so cute and I love making them for my daughters birthday parties. But to be completely honest, they are SUCH a pain to make, but definitely worth it when you are done!! These letters are just under 12" tall and 8" wide depending on the letter.
(Click the picture to left for "How to" instructions)
What You Will Need:
- Cricut Machine
- 12x24"Cricut Sticky Mat, can use 12x12 mat for smaller pieces
- Cricut scoring pen
- 12x24" Cardstock (Michaels) for sides of letters
- 12x12 Cardstock for details (I used a lot of glitter paper)
- Hot glue
- Foam Tape
- Craft Foam
- Scissors
- Acetate (optional if you want to make a letter into a shaker)
- Beads, sequins, etc (optional for the shaker)


Minnie Mouse Homemade Treats

With prices of cakes these day, I decided to try making treats myself and save over $100 (yes, everywhere I looked was quoted around $150 for a Minnie Mouse cake! Insane.) I bought these cakesicle molds from Amazon for only $10!
I made rice krispy bars from scratch and bought these Minnie Mouse Cookie Cutters from Amazon, I used the bow from that set, and used the head on this Cookie Cutter set. Once you spread out the bars you can use the cookie cutters and assemble the bow and head together. I did use food coloring for the bow (pink) and Minnie Mouse head (black)
Click on the picture for how to make these cakesicles
Resin Keychains
Resin has quickly become my new favorite hobby! The colors are vibrant and the design is unique. Please note that crafting with resin can be messy, and it should only be done in a well-ventilated area, but the results are well worth the effort. I found these molds on Amazon, see the links below


3D Number "2" with LED Lights

(Click the picture to left for "How to" instructions)
What You Will Need:
- Cricut Machine
- 12x24" Cricut sticky mat (can also use 12x12 mat for the smaller pieces
- 12x24" Cardstock Paper (Michaels) for the sides of number
- 12x12" Cardstock for decorative piece, can use glitter paper
- Scoring Pen
- Hot glue
- Craft Foam
- Acetate
- Foam Tape
- LED Lights/Fairy Lights
- Scissors
Did I mention that I love/hate making these 3D letters and numbers? I absolutely love how they turn out in the end, so all the frustration is worth it!
Click on the picture to the right to see how I made this!
"Oh TWOddles" Banner
We made this little white lemonade stand a couple years ago with wood crates from Michael and a couple 2x4's from Home Depot. I thought it would be a cute touch for this party too! I made "Oh TWOddles" banner on the top with my Cricut.
The fabric banner below is made of different pink fabric from Hobby Lobby that was very cheap, especially when they have sales going on! The fabric is cut into 1" strips and tied to any type of string you have around the house. Then I put the 3D number and a Minnie Mouse lollipop stand on top.
The lollipop stand is just a wood rod from Hobby Lobby, Styrofoam balls (I painted black and stuck together with toothpicks), and just stick lollipops right into the Styrofoam! I did have to put rocks in the pot to hold it down as it did get very heavy from all the lolli's! Then I used left over fabric I had to cover up the rocks and you're done! Easy peasy!

Party Bags
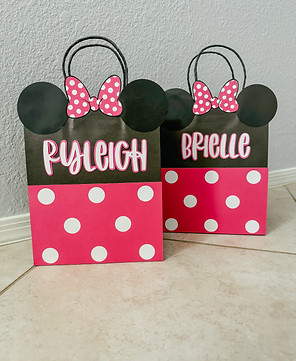
Every kid loves getting a party bag, right?! As the parent trying to find things to put into the bags, not so fun. However, to liven up the bags a little bit, this design is so easy.
Add a text field to your Cricut project and select a font you like. Then add one "Offset" layer. Make two circles for the ears to hot glue on the bag. Add a bow, I drew mine on the Procreate app on my iPad. Then for the bottom I added an 8x5" rectangle (white), duplicated it, and sliced 1" circles in the second rectangle for the top layer (Pink).
The black bags are from Hobby Lobby. For the goodies inside, I honestly just raided the dollar section at Target and Party City. I found pens, bouncy balls, Minnie Mouse bubbles, figurines, etc.
Minnie Mouse Outfit
My favorite part of kids birthday parties is planning their outfit! There are so many options but all the ones I loved were over my budget, except this one!! I got this on Amazon so I got it within two days and it was on sale for under $13!

Gift Ideas for Birthday Girl
Is it just me or is it so hard to find birthday present ideas for your second born that's also a girl?! But we did find some things that she absolutely loves! Click the links here.
- KidKraft 27 Piece Cookware Set - Plastic Dishes/Utensils
Balloon Garland
Okay, if I'm being honest, I HATE the way this balloon garland turned out. It did look good when I initially put all the balloons on, the black balloons went all the way around the top and then I put the bow balloon right in the middle and it looked great! THEN, they all started popping and they turned matte after they were blown up! We had it outside and the sun got to them. I have done many balloon garlands so I know not to over fill the balloons. I think I just bought a crappy brand of balloons because I was trying to be cheap lol. I was debating putting this on my website but I want to share the good, the bad, the ugly... here is the ugly...
I will not link the crappy balloons but here is the link to the balloon arch.


Oversized (Off the Mat) Minnie Mouse
These off the mat projects are so tricky! You have to take an image, slice it a bunch of different ways in Design Space, put it back to together and cut. That being said after I did my first one I was looking to do so many more! Click the picture to the right to see how I did it.
Minnie Mouse Wall Decor
This decal was very unnecessary but I saw it on Pinterest and thought it would be super easy and cute! This is just 3 embroidery hoops wound together with yarn. I bought different kinds of ribbon and hot glued it to the bottom of the big hoop. I found beautiful lace at Joanne Fabrics and hot glued it to the back of the hoops. Then I found some flowers and hot glued it to the top, and done!! Easy peasy!!
